How to Photograph the Moon
This year we happened to be in Lanzarote for the 13th and 14th November, when the world experienced a ‘supermoon’ to the delight of all lovers of photography and skyscapes. All photos in this post are taken in Lanzarote. Here are a few words of advice, based on our experience, about how to photograph the moon.
The moon will be at its biggest size immediately after it rises or just before it sets. Scout good locations well in advance – you want to be as close to sea level as possible and get unobstructed views of the moon just as it rises or sets.
If the sun sets after the moon has risen (as in the photo below) the moon will have a nice orange glow to it and the sky and clouds around it will benefit from the beautiful light just before sunset, usually known as golden hour. Check the sunset times in conjunction with the moon rise times and pick a day when the moon is up before the sun sets. This will give you a balanced exposure and allow you to shoot the moon in a setting or context to give it more drama and impact. There are plenty of free apps and websites that give you these times well in advance so you can plan your shots.
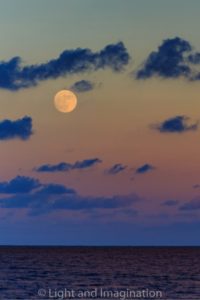
Focal length 140mm, F5.6, 1/25, ISO 100 (on a tripod)
When shooting the moon set, again it is good to check sunrise times because if the sun had already risen, the moon will not be visible for much longer afterwards and you will not benefit from its greater size given by the proximity to sea level as it sets. In the photo below (yes that is the moon!), the sun had not risen yet by the time the moon set so there was a lovely twilight illuminating the sea and the clouds, while it being dark enough for the moon to appear large and bright.
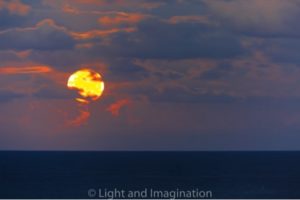
Focal length 400, f5.6, 5”, ISO 100 (on a tripod)
Remember sunrise / moonset and sunset / moonrise lag times can vary significantly from one day to the next so there will be many days when it is simply not possible to achieve these images because the sun will have set long before the moon rises, or risen well before the moon sets. Planning of locations is fundamental as well. You only have very few precious moments to see the moon rise or set, and, if there are clouds in the sky, the window of opportunity will be even shorter. So you need to be in the right place at the right time, with camera and tripod set and staring in the right direction!
Shooting the moon while it’s bright, big and high up in the sky is also a potentially rewarding task, and not as daunting an endeavor as some may think. Remember that the moon is much brighter than you imagine and much, much brighter than anything else in the night sky. If you are trying to shoot the moon well after sunset, then you must expose for the moon manually and ensure you compensate your exposure correctly or else you will just end up with a blurred white circle. Usually you need to set your shutter speed to a fast setting as the moon moves fairly quickly across the sky in an arc (also helps if you are shooting hand-held which is perfectly possible). Then pick an aperture to suit and ensure you get enough detail in the moon. All this is done in manual mode on the camera and if you’ve not attempted it before, there is nothing wrong with trial and error! It will help if you put the camera on a tripod and use live view so that you can see the detail in the moon’s surface.
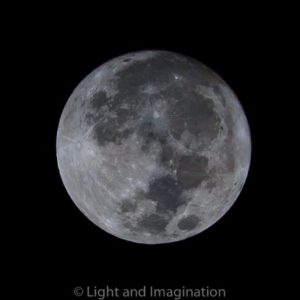
Focal length 400mm, F8, 1/320, ISO 100 (handheld)
Things get trickier when you try to expose for the ambient as well as the moon once the sun had set so there is no more sunlight to illuminate the surroundings (we are talking here of non-urban environments). Then you need to get creative with your lighting and remember that only objects that are well illuminated will appear in the photo if you are also trying to expose correctly for the moon. In the instance below, once the sun had set we headed to the hilltops of Lanzarote’s Haria mountains to get a good vantage point over the sea, which was illuminated by the bright moon. While the moon was obviously illuminated by itself, the sea and the clouds were illuminated by the moon, and everything else was in relative darkness. We used our car lights to illuminate the top of the Martian-looking Lanzarote hilltops, used a relatively long exposure and further compensated for the brightness of the moon by using a graduated ND filter. The long exposure also gave us some nice cloud movement and smoothed out the sea water.
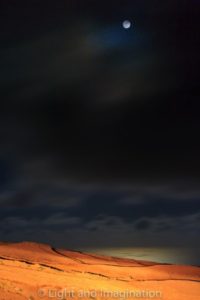
Focal length 90mm, f16, 20”, ISO 800 (on a tripod)
In an urban environment you benefit from street lights and other artificial lights which can be used to illuminate other elements you may want in your composition, as they will provide a relatively balanced exposure compared to the moon. In this example below we got a little creative with a minimalist composition including just the top of a lamppost and the moon, leaving everything else in darkness. In this scenario, one thing to be aware and mindful of is depth of field – while this is irrelevant when just shooting the moon, as soon as you add an object closer to the camera you need to adjust your f-number to ensure all desired elements are in focus.

Focal length 140, f16, 1/160, ISO 100 (handheld)
We have deliberately not specified what camera or lenses we used because people get far to hung up on talking about equipment – when settings such as the ones outlined in this blog post’s photos can be achieved with a large variety of equipment and lenses, and are brand-agnostic. We gave an indication of focal length rather than lens used as this can be achieved with different lenses and crop / full-frame cameras.
If you are interested in learning more about photography, check out our training courses available for all levels:
For Kent – www.lightandimagination.com
For London – www.photoion.co.uk